Where would you like to go?

Thursday 29 August 2013

Gatsby-inspired 21st Birthday Cupcakes

Before I wrote this post, I wanted to get into the right head space...in this case, I needed to bust out some moves to Fergie's "A little party never killed nobody {all we got}".  Fun times...hehehe.

Anyway, today I am excited to share with you a Gatsby-inspired cupcake tower I created earlier this month for the beautiful Amber-rose.  I think it's such a fun 21st birthday theme, definitely a great way to go crazy on pearls and bling and anything glam!!  Maybe an idea for my 30th next year?  We'll see...

Amber-rose's Mum was actually the one who contacted me and told me about the birthday theme, so I was so excited to get working!  I created everything from the cupcakes to the toppers.  It was labour-some but fun, and the end result - so worth it!  Here's how she looked!  Enjoy xo


Let's check her out from the top, shall we?

I just love how the acrylic tier stand makes this whole thing look classy!  So worth investing in one!

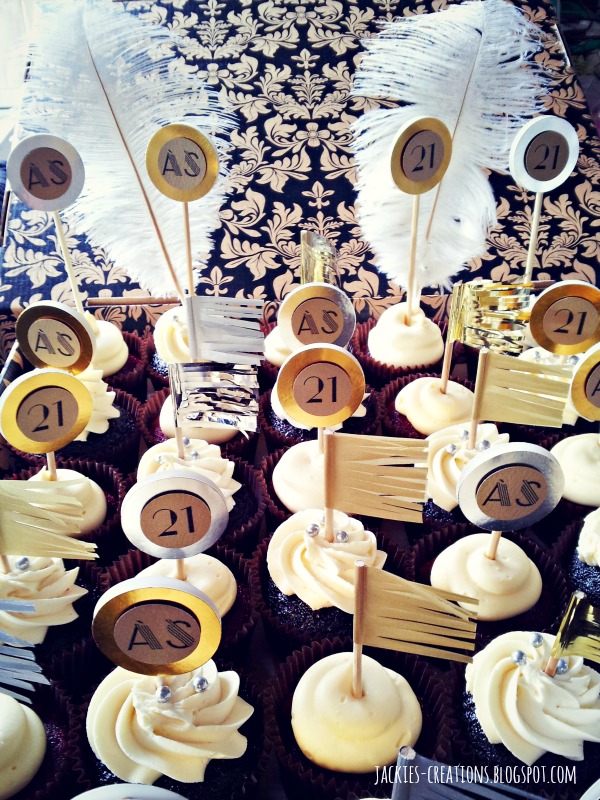
Some of the cupcake had toppers with Amber-rose's initials and age...and some had fun tassle flags.

Here are the cupcakes packed up and ready to go...

Cupcakes were chocolate with chocolate ganache center and fluffy vanilla bean buttercream frosting, and red velvet with a light whipped cream cheese frosting.  Nom nom nom!!

I hope you enjoyed today's SECOND post!  And, nothing related, but just cute to share.  Since I started writing this up this morning I had my boy Carlyle on my lap.  He is very clingy to Mummy today.  I love it but my leg is dead...hahaha.  And now enters Javier.  Definitely not gonna be able to use my legs today.  LOL.

Have an awesome day guys!!  See you back here tomorrow with maybe another double post!

xo,
Jackie

Katrina's Princess Sofia Birthday {Part 2}

Hello!  I'm back.  I know I left you with a promise that I would return with Katrina's second birthday cake when I showed you her first one last week, but blogging gets neglected when much more important matters come up.  My boys have been unwell {and are still unwell but waaaay better than a few days ago}, so blogging was definitely out of the question.  Of course, in my down time {which I had very little of} I managed to squeeze in some DIY projects that I'll share with you next month.  My aim for now is to clear my back log of things to post for the months of June/July/August.  I'm getting there...let's hope I get heaps done before the weekend!  That'll all depend on my boys' progress.

Anyway, back to Katrina's second birthday cake!  As already mentioned, her first birthday cake I shared with you last week was Umizoomi's Milli!  Today, I am happy to introduce Katrina's second birthday cake - my {second} Princess Sofia the First cake!  The first time I made this Princess Sofia the First cake was in April this year, for a sweet girl named Emma.  It's always scary trying to recreate something, because my cakes really are just one-offs.  Surely, there's no way I could exactly replicate another one of my cakes, but I definitely wasn't gonna say no to trying!  I think in some ways, the second one is even better!  Or the same?  Well, definitely not worse, so I'm glad.  

Here she is.  Enjoy xo
   

 And for some lovely details and angles...

And a progress shot just for fun...

 I hope you enjoyed today's cake feature!!  I'll do my best to get you some cupcakes tomorrow, Gatsby style!  Til then, have a safe and wonderful Thursday!

xo,
Jackie


Wednesday 21 August 2013

Katrina's Umizoomi Milli Birthday {Part 1}

Last month I had the pleasure of making not one but TWO cakes for a very lucky girl named Katrina.  She turned four and her aunt Moka always buys not one but at least TWO cakes for her very lucky nieces and nephews, no matter what age they turn.  I wish she was my aunt, hehe.

Anyway, the first cake I'm gonna share with you is Katrina's Umizoomi Milli birthday cake.  Like a lot of my {girly} cake requests, I have NO CLUE what or who the characters are.  So, I turn to my good friend Google :-)

So, without further ado, here's my cake version of Milli.  Hope ya like it!
{Note: I ended up finishing the cake in the evening so my lighting was poor...:-(}


And here are some progress shots...
Chocolaty haven...nom nom nom


I hope you liked today's cake feature!  Come back tomorrow for Katrina's second birthday cake!  Have a gray great day!!

xo,
Jackie

Friday 16 August 2013

DIY: Scrapbook map art

One of the things I absolutely love about homes is the little details that make them unique.  Today's DIY special is all about adding a touch of your identity into your home.  It is super quick and easy, and of course FUN!

Here's what ya need:
Scrapbook paper {assorted designs/colours}
Picture frame{s}
Glue stick
Scissors

You also need to work off a laptop or computer with a printer because you have to print the outline of your chosen map...otherwise if you're feeling extra artsy fartsy, just use a pen or pencil and draw :-)

Note: the map of Philippines was too complicated to cut out so I simply coloured it in using a black felt :-)  Choose your battles guys!

Now, let's let the pictures do the talking...
Print your chosen map outlines on different sheets of scrapbook paper.
Carefully cut out your map.
Glue your map onto another sheet of {cut-to-frame-size} scrapbook paper.
And frame your art work!  These frames were a score at .66cents each!!
And there ya have it!!  
Now, the map of Samoa {the red one above^} was bothering me.  It just looked wrong and I couldn't quite put my finger on it.  So I decided to scratch it and make another one.  But this time I took on board my hubby's suggestion of making it smaller so that there's more 'water' around it to make it look more like an island.  I'm glad I asked him for his opinion because he was right on the money.  It looked WAAAAY better smaller.  So, here is how they look on my {*SPOILER ALERT} gallery wall.

I just love how something so small can add so much meaning to a home.  It shows our identity in such a fun way.  Now my gallery wall is up but I won't be sharing that with you til later, so you're gonna have to wait a little while longer for that.  Don't worry, it won't be that long! :-)

Feel free to give this easy DIY project a go and send me pics of your creation!  Who knows, I may even feature your masterpiece on my blog!

Have an awesome wet weekend guys!!  And to those of you who were rattled by today's earthquakes, I am keeping you all in my prayers.  Keep warm and stay safe!  God bless!

xo,
Jackie

Wednesday 14 August 2013

Happy 21st Birthday Ryan!

Happy Wednesday everyone!!  Today I am thrilled to share with you a tyre cake I made for a 21st birthday last month.  It was my very first time to make a tyre cake, so I was all giddy about it!  {I get crazy excited when I get to attempt new things}.  I must say, there were lots of learn-as-you-go moments, but still beyond happy with the end result.  Hope you like it, too.  :-)


I personalised it even more by making a RYAN21 cakeboard border and flag.

Fondant checkered tiles and plate number.


Progress
I hope you enjoyed today's cake feature!  Can't wait to share many more cakes and DIY with you this week!  Have a wonderful Wednesday!!  Be kind to yourself :-)

xo,
Jackie

Tuesday 13 August 2013

Farewell Ritchie!

{This is a late post by the way}.

Last month I had the privilege of making a special farewell cake for my sister-in-law's bf, who was leaving NZ on his quest to pedal across Africa in 8 months.  Yup, you read right.  I am not even kidding.  How amazing is that, huh?  That's just inspiring stuff right there!  If you would like to know more, or follow his journey, you can visit him on his blog here.

Now, back to the cake.  Tele wanted to surprise Ritchie with a special cake that would best represent what he's leaving NZ to do.  Here are some pics for your viewing pleasure.  Enjoy xo

First I started with a map of Africa.

To those who couldn't see the gif above ^, here's a still version...
Please do excuse the poor quality of the final photos.  They were taken on my phone at a low-lit Thai resto.


That's him in the middle, lol.  It was a fun night!!
Well, I hope you all enjoyed today's cake feature.  I still have sooo much more cake and DIY to share with you, but I've had a sick bubba and life has been jam-packed lately.  My family will ALWAYS come before the blog, so if I seem absent from time to time, it doesn't mean I don't love you anymore, it just means I'm busy with life and will be back soon.

I will definitely try my best to post as much as I can this week in order to catch up on months missed.  Until then, stay warm and keep smilin'!

Have a toasty Tuesday!!

xo,
Jackie

Friday 2 August 2013

Sweet 13th!

Today is all about a Sweet 13th birthday that I was happy to have been a part of!  My friend April had a last minute cake request for her daughter Jade's birthday in June.  She didn't really have any ideas about what she wanted the cake to look like, so she gave me Jade's favourite colours to work with.  Instantly I wanted to create a watercolour effect on the buttercream, which I was really excited about because I first tried it in 2011 just from experimenting with a cake I was making for my Uncle.  Yup, a long time ago and it was a happy accident.  I haven't really practised this technique much since then because I've received so many cake requests that were for cakes covered in either fondant or some type of chocolate frosting.  I was sooo glad to finally give this effect a go again.  I really love how it looks!

If you would like to learn how to do this, then read on.  Recently I made a really cool how-to video for this technique.  Nah, just kidding!  I didn't have to make a video because one of my favourite bakers/bloggers, Rosie, already did!  And she did a wonderful job at explaining how to get this effect step by step.  You can check it out on her website/blog Sweetapolita if you want to give this a go yourself.  It's super fun and the end result is ahhhmazing!

Now it's time to reveal Jade's 13th birthday cake to you all!  I hope you like it!! {Photos taken on my phone}.


Now, let's take a closer look...


Yum and fun!!  Now, here are some progress shots 'cause I know you like checking these out...


Don't ya just love how the different colours swirl together in beautiful harmony?  Sooo pretty!!

Well, I hope you liked today's cake feature!  Be sure to come back next week for more CAKE and DIY!!

Have a wonderful weekend and catch you back here soon!

xo,
Jackie