Where would you like to go?

Showing posts with label DIY projects. Show all posts

Friday, 16 August 2013

DIY: Scrapbook map art

One of the things I absolutely love about homes is the little details that make them unique.  Today's DIY special is all about adding a touch of your identity into your home.  It is super quick and easy, and of course FUN!

Here's what ya need:
Scrapbook paper {assorted designs/colours}
Picture frame{s}
Glue stick
Scissors

You also need to work off a laptop or computer with a printer because you have to print the outline of your chosen map...otherwise if you're feeling extra artsy fartsy, just use a pen or pencil and draw :-)

Note: the map of Philippines was too complicated to cut out so I simply coloured it in using a black felt :-)  Choose your battles guys!

Now, let's let the pictures do the talking...
Print your chosen map outlines on different sheets of scrapbook paper.
Carefully cut out your map.
Glue your map onto another sheet of {cut-to-frame-size} scrapbook paper.
And frame your art work!  These frames were a score at .66cents each!!
And there ya have it!!  
Now, the map of Samoa {the red one above^} was bothering me.  It just looked wrong and I couldn't quite put my finger on it.  So I decided to scratch it and make another one.  But this time I took on board my hubby's suggestion of making it smaller so that there's more 'water' around it to make it look more like an island.  I'm glad I asked him for his opinion because he was right on the money.  It looked WAAAAY better smaller.  So, here is how they look on my {*SPOILER ALERT} gallery wall.

I just love how something so small can add so much meaning to a home.  It shows our identity in such a fun way.  Now my gallery wall is up but I won't be sharing that with you til later, so you're gonna have to wait a little while longer for that.  Don't worry, it won't be that long! :-)

Feel free to give this easy DIY project a go and send me pics of your creation!  Who knows, I may even feature your masterpiece on my blog!

Have an awesome wet weekend guys!!  And to those of you who were rattled by today's earthquakes, I am keeping you all in my prayers.  Keep warm and stay safe!  God bless!

xo,
Jackie

Tuesday, 30 July 2013

DIY: Rainbow wall

HELLOOOOOO BLOGDOM!  I know, I know, it's been a wee while since my last post...wee meaning months :-/  But rest assured, I haven't stopped caking or creating!  I just haven't found the time to write about them.

Until now.

So, behold!  I'll be posting EVERYTHING I've been up to while I was MIA within the next couple of weeks.  I can't wait to share them with you!!  :-)  But that does mean that I won't get to share my monthly glimpses with you until the end of August, where I'll combine the months of June, July and August into one big monthly glimpse :-)

Today I am very excited to share with you my twins' bedroom rainbow wall feature.  It was super easy to do, just a bit time consuming, but the end result was truly worth-it!  It just creates such a cool space to admire, and definitely adds a WOW factor to any kiddies bedroom.  Best of all, it's temporary!  So when it's time to switch things up again, you can just peel them off and you're back with a beautiful empty canvas to work on.  Of course, you could totally go permanent by painting directly onto the wall.  My way is suitable for those who don't want that sort of commitment, and is also ideal for renters who want to make their temporary house a home.

Before we get started, let's all sing "You're my rainbow wall" {to the tune of Oasis' Wonderwall}.


OK, so here's what ya need:

As well as some tape to adhere to your wall.

Oh, and let's not forget...
{Note: my 'helper' wasn't really much help...Carlyle just climbed up and down the ladder the whole time, making the process of application even slower...at least he had a blast}.

After dead arms and sore feet {from climbing up and down the ladder naive to the fact that I was supposed to protect my soles with footwear}, we got a pretty awesome rainbow wall!!


Not sure how long we'll keep this rainbow wall up for, but hopefully it'll last for the rest of the year.  We'll see if I get a sudden urge to create something else before then, eh?

I hope you all enjoyed today's DIY feature!  Be sure to give this easy project a go in your own kiddo's bedrooms {or another room in your home} and send me pics of the end product!  You could even switch things up by changing the colour theme, or the shape!!  The sky's the limit!!

So go on and have fun with this project and I'll see you back here soon!!

xo,
Jackie

Monday, 10 December 2012

Baubles baubles {Part Two}

What a crazy week we had last week, huh?  With tornadoes and all!  So sad to hear about the lives lost from that scary day, but also from all the wrecked homes that families couldn't go home to.  My thoughts and prayers are with all of you.  Let's hope for continued beautiful sunny days like today from here on in!

Remember, last week I shared Part One of my bauble series?  Well, today, I'd like to share Part Two with you.  I know, I know, I was supposed to share this with you last Friday...so sorry!!  This project is my favourite because it's so simple, unique, and you can get your kiddies involved!!  Plus it's sooo much fun and adds such a different look and feel to your Christmas tree!  {Note: just be careful with the glass bauble if getting little kids involved, because they will break if dropped on hard flooring - speaking from experience here, hehe}.


Depending on how thick your paint is, allow at least a couple of days to dry.  If you want to be safe, leave it for about a week to ensure complete dryness!

Now, feel free to give this project a go with your family and don't forget to share your final projects with me here!  Can't wait to see what you all come up with!!

Have a blessed day and week!!  See you back here tomorrow!!

xo,
Jackie

Thursday, 6 December 2012

Baubles baubles {Part One}

Today I am excited to share some craftivities with you perfect for Christmas!!  They are simple to do and sooo much fun to make!  Plus, they look awesomely great!!

First, you'll need clear glass bauble tree ornaments.  Now, if you're in NZ these babies may be a little hard to find.  I found mine over a month ago at our local Spotlight.  You may be able to find them elsewhere, but where I am that's pretty much the only place I could get them.

There were plenty of things I wanted to try out, but decided on just a couple that would look best with our origami themed Christmas tree this year.  My oldest son {Jubs} has really been into making all sorts of origami {thanks to his Tita Kat who helped rekindle his love for it} and so that's how our origami themed tree came about.

Today, I'd like to share with you Part One of our Bauble series!


Here are three glass baubles with my boys' initials -
{Javaughn Canaan, Javier Stanley & Carlyle Micah}
Fill'em with stars, giv'em a li'l shake, and you've got yourself your very own personalised starry bauble!!
I made six of these in total - Nesi {our family name}, Mum, Dad, Jc, Js and Cm.  Just a little something personal and special to go on our tree.  Hope you liked today's DIY feature!  Feel free to use this idea for your own family and be sure to send me a pic when you're done!!  I can't wait to share with you Part Two tomorrow!!

Stay safe out there on the roads guys!  Praying that this stormy weather will come to pass soon.

xo,
Jackie

Friday, 7 September 2012

DIY stripes for a mime!!

This week has been pretty full on at my oldest son's school {Summerland Primary}.  They had their production {Cinderella Circus} running all week.  My poor Jubs is so exhausted but we are sooo proud of him for always putting on his best performance!!  Seeing him perform puts the biggest smile on my face because it is one of the things I'm so passionate about!

Cinderella Circus is such a fun story that is made up of so many wonderful acts!!  One of the acts is the MIME scene {which Jubs is in}, and because schools are always working on a tight budget, we had to get creative!!  Megan {one of the teachers in charge, and also a friend of mine} and I decided to use masking tape and black spray paint to create these striped shirts.  The taping part was very time-consuming, and me being a bit of a perfectionist, I just couldn't resist getting all the corners just right {which meant cutting all sorts of angles just so they fit perfectly and not overlap - LOL}.  I also placed old {flattened} cereal boxes underneath the shirts to protect the inside...not that you could see it anyway, but that's just how I roll!!  Here are some progress shots for you to check out!!  I will post up some pics of the actual show next week!!  So stay tuned!!


 Hope you enjoyed today's DIY post...I know it has been a while since my last project, but now that the sun is shining you'll definitely be seeing more projects here - so stay tuned  AND thanks for your patience!!!

xo,
Jackie
 

Friday, 22 June 2012

Burlap Memo Board

I'm so excited to share with you a tutorial on how to add character to your memo {cork} board!!  I love all things vintage, rustic, aged, etc etc, so this project was perfect for what I was looking for!!  I made this last night and it didn't take me long at all.  All the things I used for this project I already had at home, so I spent NUDDA which makes me even more happier!! 

My son Jubs got this memo board for Christmas last year, but it was actually a double up as I had already bought him (a bigger) one, leaving this baby in my pile of things to prettify (not sure if that's an existing word, but I'm just gonna roll with it...hehe).  I also have tons of burlap from my nephew Josiah's 1st birthday party, so I wanted to use some of that.

For all you visual peeps like me, here's a step-by-step pictorial on how I made this beauty!!  I used my phone to take the pics because it was much easier to hold in one hand than an SLR, so the quality is not the greatest.


back

front

You could also use this time to stencil/paint something on (if you wanted to personalise it).  I originally wanted to do that, but decided to leave it for another day.  I was too excited to get this baby done!!


 If you wanted to, you could tidy up the back by sewing the ends of the burlap (I just didn't bother because I just wanted it done!!)


 ...and voila!!
My very own burlap memo board!!

This beauty is going to live by our entrance so we can see all the important reminders before we leave the house.  Hope you enjoyed today's post!  Hope to see you back here next week with even more DIY projects!!  Can't wait!!

Have a wonderful weekend!!

xo,
Jackie

Thursday, 29 March 2012

Let's get organised y'all!!

Hey guys!!  Hope you are enjoying this glorious day we are having!  I'm in such an organising mood today, thanks to a certain messy house that desperately needs tidying up!  LOL.  No, but I have been feeling rather drained lately, so I haven't spent much time organising the house.  I wouldn't go as far as to use the word 'neglect' because the house is not too bad...I still manage to do a quick tidy up here and there, but today I have made the decision to get my A into G - no matter how I am feeling!!

Remember how I shared with you this DIY storage box I made out of my boys' nappy boxes??  Well, since then I've made two and have already found use for them - it's awesome!!  Then I wanted to get my oldest son Javaughn to tackle his legos.  I did implement a system a few months ago, using buckets, and it was a great idea for a while, until I needed the buckets for something else...

I was at Kmart a couple of weeks ago and stumbled upon these cardboard storage boxes.  You get two for the price of 75c!!!  I actually thought it was a typo, so I went to the cashier to confirm it.  I grabbed 3 sets for Javaughn, to store all his lego.  
The boxes can be stacked two-high per shelf (see pic below), which is a great way to utilise all that space.  Having uniformed boxes really adds that special touch to his bedroom - it now looks awesome!!
He only ended up needing 4 because the boxes were pretty big, so I used the other 2 for my personal storage (to keep important documents together, etc).  And to make it even more efficient, we added labels on them (that I picked up from a variety store for $2) so we can see exactly what's inside without having to open up all the boxes!  (Please excuse this next blurry shot).

To ensure the boxes were being used to their full potential, I inserted dividers for those 'not so many' pieces to live in...
I love it when I see bargains that offers practical solutions!!  <3

Since we're discussing organisation today, here are some tips for how to get organised!  Laura, from I'm an Organizing Junkie, has put together a wonderful PROCESS to help anyone who is in need of some help on how to get started.  Her site offers sooo many different organising solutions, and I'm pretty sure she has answered (or can answer) any questions you may have.  Go on and check it out!  I promise it won't disappoint!!

So, if you've been ignoring the pile of clothes that desperately needs folding, or that kitchen sink that has a mountain of pots that need washing, why don't you join me today and tackle at least ONE area that needs attention?  Be sure to really invest a reasonable amount of time on completing that task, too.  I guarantee you will feel awesome afterwards!!  And one step closer to a tidier and more organised home!!

Happy organising everyone!!

xo

Psst...I'm currently working on two cakes...here's a progress shot of one of them...
...will tell you more about this next week, so stay tuned!!


Thursday, 8 March 2012

DIY storage box

I know, I know, I haven't posted too many DIY stuff for y'all lately.  It doesn't mean I haven't been doing any.  I just haven't been diligent at sharing them here.  I still have 'stuff' I did last year that I haven't shared yet...now I can't find the photos!  lol.  So I thought it was about time I shared something with you that's purely DIY (and non-cake related for a change).

I actually made this baby yesterday, when I was trying to find a (cheap...meaning FREE) storage solution for my junk stuff.  It didn't involve much, just a nappy box, adhesive spray, some wrapping paper, and scissors.  It's super easy and so worth-it!!  I promise!!

Now, pictures can definitely say more than a thousand words, so here they are!!

 You can use whatever box you want!  I happened to have an empty nappy box lying around.  First you need to cut off the top flaps of the box.

You need to select two different designs of wrapping paper for both exterior and interior.  Cut them to size so you are all ready to stick!

Beginning with the exterior, take your box outside and lightly mist over (using your adhesive spray) the side you're working on.  Apply your chosen wrapping paper, then repeat this process until you complete covering all the sides (including the bottom).

Use the same application process for the interior.

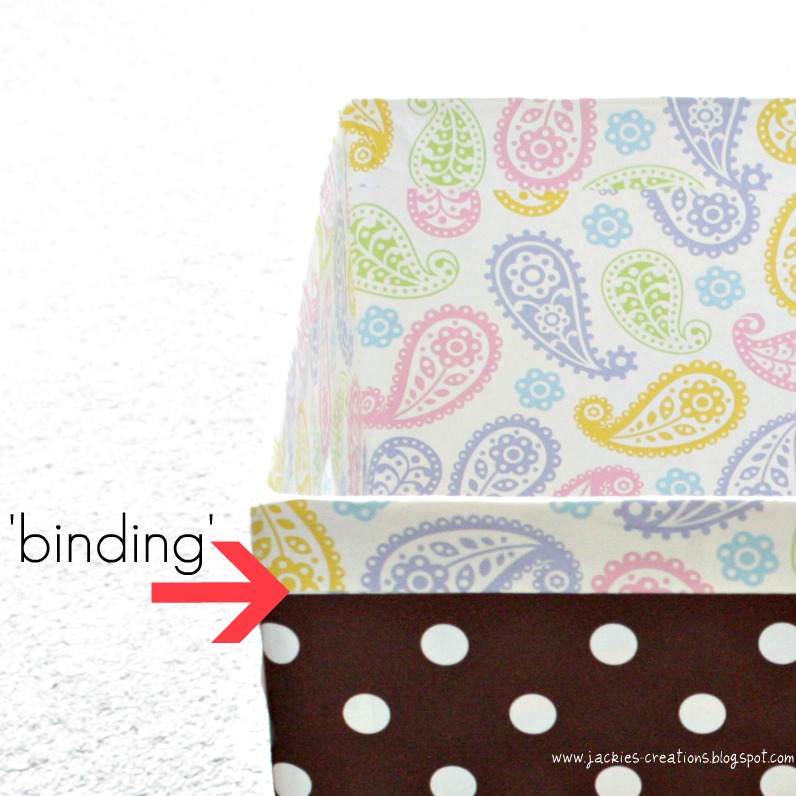
Now, cut extra strips (using the interior wrapping paper) to create a 'binding'.  Adhere to the top of the box (so this piece should be adhered to the interior then folded over to the exterior of the box) to achieve a seamless look (see picture below).

Then you should end up with something like this!

And now here's a very deserving BEFORE & AFTER pic for you guys...

With this DIY project, feel free to switch the wrapping paper to fabric (which is what I originally intended to do but didn't want to spend a cent).

My advice for this project is to not be afraid to use what you already have.  Sometimes colours and designs that you wouldn't normally put together can actually complement each other.  I mean, I mixed paisley and polka dots!  And soft pastel colours with brown!  Take a risk!   You'd be amazingly surprised!

Have a wonderful Thursday!!

xo

Note: I made a second box, exactly the same, but this time I started with the interior.  I don't really have any preference to be honest, so start wherever you like!  I can't wait to try a fabric version!  Time to rummage through my Mum's wonderful fabric collection I think, hehe :-)